Electrofishing is a specialized and highly effective form of fish surveying that requires adequate knowledge and training to minimize the hazardous risk of mixing electricity and water.
Quick Summary
- Safety and knowledge are top priority before getting started electrofishing. Wear the proper safety equipment (never wear breathable waders!)
- Understanding the difference in AC, DC, and PDC current settings to increase effectiveness of your operation as well as minimize the risk of potential damage to fish populations.
- Time of day that electrofishing is most effective - and equipment you need to see more fish.
- Fish capture and handling techniques that make for safe and successful sampling
The idea of electrofishing first came about in a patent application in 1863 by Isham Baggs, was later brought to the market with stationary generators in the 1920's and over the past century has been continuously improved to become among the most prominent methods of fish surveying.
Our Involvement in Electrofishing
Outrigger Outdoors supplies purpose-built lights for electrofishers. Whether electrofishing from a boat, tote and barge, or walking; we have designed and developed various types of lights that help you see more fish regardless of the water conditions or clarity. To learn more about the electrofishing lights we offer, we encourage you to read our article on Electrofishing Lights: The Key to Nighttime Fish Surveying.
Let's talk more about how to get started electrofishing.
Getting Started Electrofishing
Step 2: How to Setup Electrofisher Control Unit
Step 3: Time of Day for Successful Fish Surveying
Step 4: Fish Capture and Handling Techniques for Successful Sampling
Step 1: Safety and Knowledge
If you're not careful, electrofishing can be dangerous. Take the time to do your own research on electrofishing (as you are currently doing), learn from experienced electrofishers, and never operate alone.
Educate Yourself
The first step in educating yourself is learning what your electrofishing equipment does and how it operates. Prior to every electrofishing trip, it's also important to perform a visual inspection on all equipment. You must fully understand the effect an electrofishing unit has on its surroundings - such as hand-held electrodes should never be used as dip nets.
At least two members on board should be first aid and CPR certified. Group leaders should be formally trained and have many hours (100+) of electrofishing experience. All personnel should have orientation to the equipment and procedure used. Electrofishing should never be done alone.
Electrofishing should not be done during thunderstorms and if crew clothing becomes wet, it should be stopped immediately.
All personnel in crew should be in direct communication with one another, settings on electrofisher units should not be adjusted unless output power is turned off.
Safety Equipment
Here is a list of safety equipment that is required at an absolute minimum for electrofishing:
Gloves: Gauntlet-style electrician's gloves rated for 7,500 V are recommended.
Boots: Rubber boots should be wore on boats.
Waders: Non-breathable waders should be used when wading and electrofishing. Breathable waders that allow water intrusion can be dangerous.
Personal Floatation Devices (PFDs): According to USCG regulations in boats, PFDs are required. They should also be used when wading in deeper areas or if the water is judged to be fast moving.
Fire extinguisher: Type ABC fire extinguisher should be used in electrofishing boats.
Step 2: How to Setup Electrofisher Control Unit
Electrofishers are devices that use electrodes to form electrical fields in water. They are typically battery or generator powered, most units used for longer periods of time are generator powered.
Types of Electrofisher Waveforms
There are three types of waveforms used in electrofishing: alternating current (AC), direct current (DC) and pulsed direct current (PDC).
- AC current can be used at low water conductivities, but is more likely to injure fish (higher voltage).
- DC current is far more safe for fish, but can drain batteries rapidly if using a battery setup.
- PDC current is commonly used because it can be fluctuated to be most effective for fish capture and well being.
Most modern day electrofisher units utilize PDC waveform, which is what we will discuss in more detail.
An electrofisher manufacturer, Smith Root, Inc. explains in more depth the methods of PDC waveform controls:
- PDC is controlled by height and shape of the waveform
- Waveform height refers to peak voltage (Vp) and is set by voltage selection.
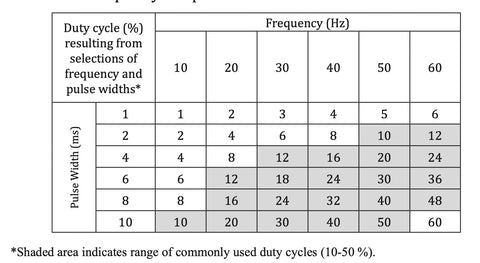
- Waveform shape is set by frequency (pulses per second or hertz, Hz) and pulse width (milliseconds, ms) or duty cycle (percent on-time, %).
- Frequency (f) determines the period (T) of one cycle (time of start of one pulse to start of next pulse).
- Period, T = 1000 ms / f
- Average voltage (V ave) depends on peak voltage, frequency and duty cycle.
- Duty Cycle (Duty) is Pulse Width (PW) divided by Period (T) times 100.
- Duty = (PW / T) * 100
- Alternate formula: Duty = (PW * f)/10
- One some electrofishers, duty can be set directly; on others it is set indirectly.
The following table provided by Smith Root can be used to determine duty cycle for units requiring selection of frequency and pulse width:
Exception: Smith-Root GPP electrofishes have a control called Percent of Range (POR) - also Percent of Power - that changes voltage and pulse width; frequency is controlled independently. Increase in POR from 0% to 50% results in increase in voltage and pulse width. Above 50% POR, pulse width continues to increase but voltages changes very little. Peak voltage at various POR settings depends on the voltage range selected: low range, 50-500 volts or high range, 100-1000 volts.
One must use an oscilloscope to measure peak voltage, period and pulse width at various POR values, in both voltage ranges, to enable a conversion from POR to peak voltage and duty cycle.
Setting Up Your Electrofisher Control Unit
The first step in properly setting your control unit is to look for threshold settings, which are the minimums recommended by the manufacturer to achieve satisfactory electrofishing.
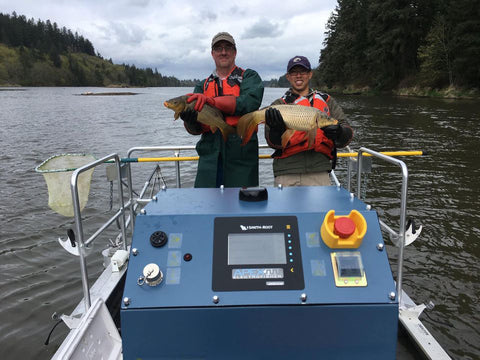
Photo courtesy of Smith Root, Inc.
The settings of PDC, in order of highest to lowest risk for causing fish trauma; are frequency, voltage, and duty cycle (or pulse width).
- Start with low frequency and pulse width / duty cycle.
- Duty cycle may be as low as 10% but should not exceed 50%; 20-25% is optimal.
- Scaleless and fine-scaled fish are most sensitive to electrical shock.
- Start at 20-30 Hz frequency and 10-20% duty cycle (5-10 ms pulse width).
- Fish with heavier scaling are less sensitive to electrical shock.
- You may need to start with 50-60 Hz and 20-30% duty cycle (3-6 ms pulse width).
- Threshold PDC settings may be manually determined by the following procedure:
- Start electrofishing at low voltage and 10% duty cycle' increase voltage in 20-V, 50-v or 100-V steps to maximum.
- If electrofishing is not satisfactory, increase duty cycle or pulse width; repeat step 1.
- If duty cycle reaches 50% without satisfactory results, reset duty cycle to 10%.
- Increase frequency and repeat steps 1, 2, 3.
- Continue the process until satisfactory electrofishing is achieved.
Note: threshold determination can be done quickly with a series of 2-5 minute trials.
Electrode Selection: Choose The Right Size Anode
The combined surface area of all electrodes, along with water conductivity will determine the power requirement of an electrofishing system. The size of anode you use should be adjusted depending on fish size and species you are sampling.
- High water conductivity = more power
- Power requirement can be reduced if frequency and duty cycle area decreased while maintaining sufficient voltage for capture.
- Water conductivity should be measured prior to every electrofishing operation.
- Anode selection is useful in dealing with size selectivity and fish trauma
- Most anodes are cylinders or rings, the thickness of the material is critical in determining the intensity of the electrical field.
- 1/8-inch to 1/4-inch thick anodes create small, intense fields useful for capturing small fish and letting larger ones escape. However, these intense fields can risk harm to fish that are close to the anodes.
- 1/4-inch to 1/2-inch thick anodes create larger electrical fields with less intensity near the anode and are useful for capturing larger fish while allowing smaller fish to escape.
Step 3: Time of Day for Successful Fish Surveying
Fish surveying is more easily and successfully accomplished at night. The reason for this is when the sun goes down, the fish are naturally going to come into the shallows to feed. During the day time, fish are deeper.
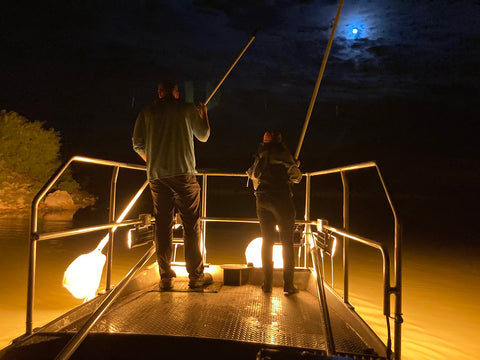
Photo courtesy of New Mexico Department Fish, Wildlife, and Conservation Ecology; utilizing their Swamp Eye HD Electrofishing Lights.
There's one key ingredient to successfully electrofishing at night, and that's choosing lights that will help you see more fish in clear and muddy water.
Light output is measured in wavelength, and the best wavelength light for electrofishing in muddy water is 2000k. The best wavelength for clear water is 6000k. Water conditions and clarity can rapidly change, so electrofishing lights that are capable of adjusting between these two wavelengths are a must-have to maximize visibility regardless of the water clarity.
There are two main options to choose from that are capable of these features for electrofishing: Swamp Eye HD (flood style) Lights and Swamp Eye Gen 2.X Light Bars. These two lights are capable of adjusting wavelength on the fly, allowing you to see more fish in any water condition.
Let's do a comparison of these two electrofishing lighting options:
Swamp Eye HD Electrofishing Lights
- 160 watt flood style light, color adjustable for clear or muddy water
- 12 inches long, 6 inches tall, 3 inches deep.
- Plug and play building block wire harness makes wiring and setup a breeze.
- Compatible with the all new OutriggerGo app which allows you to have full control of your lights from your phone.
Swamp Eye Gen 2.X Electrofishing Light Bars
- 120 watt flood style light bar, does not cast quite as wide of a flood as the Swamp Eye HD, color adjustable for clear or muddy water.
- 23 inches long, 4.5 inches tall, 3.5 inches deep (longer, lower profile in comparison to the Swamp Eye HD).
- Plug and play building block wire harness makes wiring and setup a breeze.
- Compatible with the all new OutriggerGo app which allows you to have full control of your lights from your phone.
Main Differences in the Above Two Lights:
- Swamp Eye Gen 2X Light Bars are lower profile and can fit in more compact areas. In terms of electrofishing, this is not typically a major problem.
- Swamp Eye HD's provide a larger flood area in comparison to the light bars. The light bars are going to be a little more directional when compared to the Swamp Eye HD's; but the light bars are still very intense.
- If looking to run on battery, the Swamp Eye Gen 2X Light Bars draw less power (120 watts) compared to the Swamp Eye HD's (160 watt), which means longer run time on batteries.
- Swamp Eye HD's are our current #1 selling electrofishing light.
To learn more about electrofishing lights, we encourage you to read our article Electrofishing Lights: The Key to Nighttime Fish Surveying.
Step 4: Fish Capture and Handling Techniques for Successful Sampling
The risk of fish trauma increases when fish are immobilized. It's best to capture fish while they are still swimming in order to minimize the risk of causing trauma to fish.
Here are some key points to keep in mind when capturing and handling fish:
- Avoid cumulative electroshock by netting fish immediately or turning off power if they become immobile in the electrical field.
- Do not allow fish to accumulate in the dip net.
- When fish are pulled from the water, allow them to recover in darkened, quiet water maintained at ambient temperature and adequate dissolved oxygen levels. This can be accomplished with tanks in the boats or in-stream containers while wading.
- Fish should regain equilibrium in one minute or less; excessive recovery time or injury (e.g. bruising) means fish are being over exposed to electrical shock.
- If fish can be hand captured while being held, they are not ready for release.
- Once fish are ready, release them into quiet backwaters near cover.
Thank you for reading along, for more information on electrofishing - here are some other electrofishing articles we have put together.

